概要
Android M では、デバイスのロックメカニズム(パターン入力などのロック画面など)をアプリ内のユーザ認証に利用できるようです。 セキュリティ要件的に問題なければ、デバイスのロック画面をユーザ認証に使うことで、アプリ固有のパスワードが不要になったり、認証画面の実装が不要なるという利点がありそうです。 また新しく追加されるAPIにより、デバイスのロック画面を直近でパスしていればアプリ側での認証画面をスキップする、ということができるため、ユーザの利便性を向上させることができそうです。
Api Overview より抜粋です。
Authentication
This preview offers new APIs to let you authenticate users by using their fingerprint scans on supported devices, and check how recently the user was last authenticated using a device unlocking mechanism (such as a lockscreen password). Use these APIs in conjunction with the Android Keystore system.
Confirm Credential
Your app can authenticate users based on how recently they last unlocked their device. This feature frees users from having to remember additional app-specific passwords, and avoids the need for you to implement your own authentication user interface. Your app should use this feature in conjunction with a public or secret key implementation for user authentication.
追加されたAPIについて
Android M では KeyPairGeneratorSpec の代わりにKeyGenParameterSpec を利用することが推奨されるようです。

スクリーンショット 2015-06-21 1.51.29.png Android M からは秘密鍵(対称鍵)の生成は、KeyGenParameterSpec を利用する方がよさそうです。
新しい KeyGenParameterSpec.setUserAuthenticationRequired() メソッドとKeyGenParameterSpec.setUserAuthenticationValidityDurationSeconds() メソッドを利用することで、生成した秘密鍵を使って暗号化(Cipher.init)する際に、ユーザが認証されていなければ例外を発生させることができます。 デバイスのロック画面をパスしているか、アプリから表示する認証画面(ロック画面と同様な画面)をパスすると、認証された状態になります。 またsetUserAuthenticationValidityDurationSeconds()で指定した秒数以内に認証済みのユーザには認証画面を表示されません。
Confirm Credential sample
https://github.com/googlesamples/android-ConfirmCredential サンプルプログラムの要約を行います。
ロック設定の有無をチェック
@Override
protected void onCreate(Bundle savedInstanceState) {
    ...
    mKeyguardManager = (KeyguardManager) getSystemService(Context.KEYGUARD_SERVICE);
    if (!mKeyguardManager.isKeyguardSecure()) {
        ...
        return; //画面のロックが設定されていない
    }
    createKey();
    ...
}
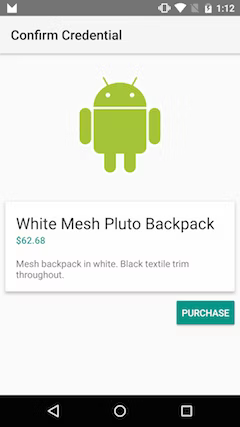
画面のロックが設定されていれば、下記のようにPURCHASEボタンが表示されます。

秘密鍵を生成してAndrodKeyStoreに保存
private void createKey() {
    try {
        KeyStore keyStore = KeyStore.getInstance("AndroidKeyStore");
        keyStore.load(null);
        KeyGenerator keyGenerator = KeyGenerator.getInstance(
                KeyProperties.KEY_ALGORITHM_AES, "AndroidKeyStore");

        keyGenerator.init(new KeyGenParameterSpec.Builder(KEY_NAME,
                KeyProperties.PURPOSE_ENCRYPT | KeyProperties.PURPOSE_DECRYPT)
                .setBlockModes(KeyProperties.BLOCK_MODE_CBC)
                .setUserAuthenticationRequired(true)
                .setUserAuthenticationValidityDurationSeconds(AUTHENTICATION_DURATION_SECONDS)
                .setEncryptionPaddings(KeyProperties.ENCRYPTION_PADDING_PKCS7)
                .build());
        keyGenerator.generateKey();
    } catch (NoSuchAlgorithmException | NoSuchProviderException
            | InvalidAlgorithmParameterException | KeyStoreException
            | CertificateException | IOException e) {
        throw new RuntimeException("Failed to create a symmetric key", e);
    }
}
setUserAuthenticationRequired(true)メソッドでユーザ認証を必須化します。 setUserAuthenticationValidityDurationSeconds(AUTHENTICATION_DURATION_SECONDS)メソッドで直近30秒以内にユーザ認証されていれば、認証画面をスキップするように設定しています。 (ちなみにsetUserAuthenticationValidityDurationSecondsを呼ばないと指紋認証が必須になりました。)
秘密鍵を利用して暗号化
private void tryEncrypt() {
    try {
        KeyStore keyStore = KeyStore.getInstance("AndroidKeyStore");
        keyStore.load(null);
        SecretKey secretKey = (SecretKey) keyStore.getKey(KEY_NAME, null);
        Cipher cipher = Cipher.getInstance(
                KeyProperties.KEY_ALGORITHM_AES + "/" + KeyProperties.BLOCK_MODE_CBC + "/"
                        + KeyProperties.ENCRYPTION_PADDING_PKCS7);

        cipher.init(Cipher.ENCRYPT_MODE, secretKey);
        cipher.doFinal(SECRET_BYTE_ARRAY);

        showAlreadyAuthenticated();
    } catch (UserNotAuthenticatedException e) {
        showAuthenticationScreen();
    (略)
}
直近30秒以内にユーザが認証されていなければ cipher.init(Cipher.ENCRYPT_MODE, secretKey);でUserNotAuthenticatedExceptionが発生します。ユーザが認証されていれば、秘密鍵を使って暗号化できます。 ちなみに発生する例外は下記のようなものです。
android.security.keystore.UserNotAuthenticatedException: User not authenticated
at android.security.KeyStore.getInvalidKeyException(KeyStore.java:711)
at android.security.KeyStore.getInvalidKeyException(KeyStore.java:749)
at android.security.KeyStoreCryptoOperationUtils.getInvalidKeyExceptionForInit(KeyStoreCryptoOperationUtils.java:52)
at android.security.KeyStoreCryptoOperationUtils.getExceptionForCipherInit(KeyStoreCryptoOperationUtils.java:87)
at android.security.KeyStoreCipherSpi.ensureKeystoreOperationInitialized(KeyStoreCipherSpi.java:312)
at android.security.KeyStoreCipherSpi.engineInit(KeyStoreCipherSpi.java:173)
at javax.crypto.Cipher.init(Cipher.java:663)
at javax.crypto.Cipher.init(Cipher.java:623)
at com.example.android.confirmcredential.MainActivity.tryEncrypt(MainActivity.java:115)
at com.example.android.confirmcredential.MainActivity.access$000(MainActivity.java:54)
at com.example.android.confirmcredential.MainActivity$1.onClick(MainActivity.java:90)
at android.view.View.performClick(View.java:5147)
at android.view.View$PerformClick.run(View.java:21069)
認証画面を表示する
private void showAuthenticationScreen() {
    // Create the Confirm Credentials screen. You can customize the title and description. Or
    // we will provide a generic one for you if you leave it null
    Intent intent = mKeyguardManager.createConfirmDeviceCredentialIntent(null, null);
    if (intent != null) {
        startActivityForResult(intent, REQUEST_CODE_CONFIRM_DEVICE_CREDENTIALS);
    }
}
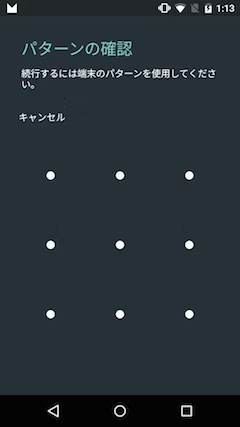
次のような認証画面が表示されます。(この端末はパターンが求められていますが、パスワードやPINを設定していればそれが表示されます)

認証完了後の処理
@Override
protected void onActivityResult(int requestCode, int resultCode, Intent data) {
    if (requestCode == REQUEST_CODE_CONFIRM_DEVICE_CREDENTIALS) {
        // Challenge completed, proceed with using cipher
        if (resultCode == RESULT_OK) {
            showPurchaseConfirmation();
        } else {
            // The user canceled or didn’t complete the lock screen
            // operation. Go to error/cancellation flow.
        }
    }
}
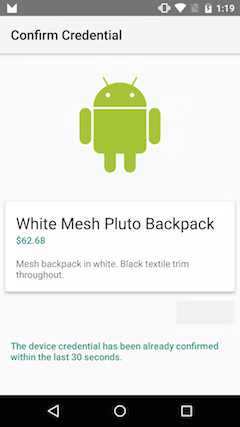
RESULT_OKなら認証済みですので、支払いを進めます。 サンプルでは次のような画面が表示されます。
