ブログサイトを1から作ってみた の続き。
個人ブログのインフラ管理を Terraform で自動化し、GitHub Actions を使って簡単にインフラの変更ができるようにした。
Terraform の準備
まずローカルの PC に Terraform をインストールする。
ここでは tfenv で Terraform のバージョンを管理することにした。
tfenv は HomeBrew でインストールできる。
$ brew install tfenv
tfenv で terraform の最新版をインストールする。
$ tfenv install 1.4.2
$ tfenv use 1.4.2
※ Terraform 環境をイチから構築するのは初めてなので、Terraform のチュートリアルをやって慣れておいた。 https://developer.hashicorp.com/terraform/tutorials/aws-get-started/aws-build
Terraform 用のディレクトリを作成して移動
$ mkdir -p terraform/website
$ cd terraform/website
main.tf ファイルを作成して、次のように設定を記載する
# main.tf

terraform {
  required_providers {
    aws = {
      source  = "hashicorp/aws"
      version = "~> 4.16"
    }
  }

  required_version = "= 1.4.2"
}

provider "aws" {
  region = "ap-northeast-1"
}
Terraform を初期化する
$ terraform init
terraform import
手動で作成した AWS インフラリソースをインポートしていく。
基本的な流れは以下。すべてのリソースに対して 1〜4 を繰り返す。
- インポートしたいリソースを
main.tfファイルでresourceとしてファイルに追加 terraform importコマンドでリソースをインポートterraform planコマンドを実行して差分があればmain.tfファイルを変更
差分がなくなるか、許容できる差分になるまでこのステップを繰り返すterraform applyコマンドを実行
terraform import のオプションはリソースごとに違う。オプションは各リソースのTerraform ドキュメントの一番下に載っている。
https://registry.terraform.io/providers/hashicorp/aws/latest/docs/resources/acm_certificate#import
例えば Hosted Zone をインポートする場合は、次のように main.tf に記載し、
# main.tf

resource "aws_route53_zone" "nshmura_com" {
  name = "nshmura.com"
}
terraform import コマンドでリソースをインポートする
$ terraform import aws_route53_zone.nshmura_com {ゾーンのID}

aws_route53_zone.nshmura_com: Importing from ID "{ゾーンのID}"...
aws_route53_zone.nshmura_com: Import prepared!
  Prepared aws_route53_zone for import
aws_route53_zone.nshmura_com: Refreshing state... [id={ゾーンのID}]

Import successful!

The resources that were imported are shown above. These resources are now in
your Terraform state and will henceforth be managed by Terraform.
terraform plan を実行して差分がないことを確認
$ terraform plan

aws_route53_zone.nshmura_com: Refreshing state... [id={ゾーンのID}]

No changes. Your infrastructure matches the configuration.
terraform apply を実行しておく(差分がないのでスキップも可)
$ terraform plan

aws_route53_zone.nshmura_com: Refreshing state... [id={ゾーンのID}]

No changes. Your infrastructure matches the configuration.
参考までに、各リソースの terraform import コマンドを載せておく
$ terraform import aws_acm_certificate.nshmura_com arn:aws:acm:us-east-1:{AWSアカウントID}:certificate/{certificate ID}
$ terraform import aws_route53_record.nshmura_com_validation {validation ID}.nshmura.com
$ terraform import 'aws_route53_record.nshmura_com_validation["*.nshmura.com"]' "{certificate ID}_{validation ID}.nshmura.com_CNAME"
$ terraform import 'aws_route53_record.nshmura_com_validation["nshmura.com"]' "{certificate ID}_{validation ID}.nshmura.com_CNAME"
$ terraform import aws_s3_bucket.website {バケット名}
$ terraform import aws_s3_bucket_public_access_block.website_private {バケット名}
$ terraform import aws_s3_bucket_policy.allow_access_from_cloudfront {バケット名}
$ terraform import aws_cloudfront_distribution.website {ディストリビューション ID}
$ terraform import aws_cloudfront_origin_access_control.website {オリジナルアクセスコントロール ID}
すべてのリソースを記載した main.tf はこちら
# main.tf

terraform {
  required_providers {
    aws = {
      source  = "hashicorp/aws"
      version = "~> 4.16"
    }
  }

  required_version = "= 1.4.2"
}

provider "aws" {
  region = "ap-northeast-1"
}

provider "aws" {
  region = "us-east-1"
  alias  = "us_east_1"
}

// hosted zone
resource "aws_route53_zone" "nshmura_com" {
  name = "nshmura.com"
}

// acm
resource "aws_acm_certificate" "nshmura_com" {
  domain_name       = "nshmura.com"
  validation_method = "DNS"

  lifecycle {
    create_before_destroy = true
  }

  provider = aws.us_east_1
}

// DNS record for acm certificate validation
resource "aws_route53_record" "nshmura_com_validation" {
  for_each = {
    for dvo in aws_acm_certificate.nshmura_com.domain_validation_options : dvo.domain_name => {
      name   = dvo.resource_record_name
      record = dvo.resource_record_value
      type   = dvo.resource_record_type
    }
  }

  allow_overwrite = false
  name            = each.value.name
  records         = [each.value.record]
  ttl             = 300
  type            = each.value.type
  zone_id         = aws_route53_zone.nshmura_com.zone_id
}

// acm certificate validation
resource "aws_acm_certificate_validation" "nshmura_com_validation" {
  certificate_arn         = aws_acm_certificate.nshmura_com.arn
  validation_record_fqdns = [for record in aws_route53_record.nshmura_com_validation : record.fqdn]
  provider                = aws.us_east_1
}

// s3 bucket
resource "aws_s3_bucket" "website" {
  bucket = "{バケット名}"
}

resource "aws_s3_bucket_public_access_block" "website_private" {
  bucket                  = aws_s3_bucket.website.id
  block_public_acls       = true
  block_public_policy     = true
  ignore_public_acls      = true
  restrict_public_buckets = true
}

resource "aws_s3_bucket_policy" "allow_access_from_cloudfront" {
  bucket = aws_s3_bucket.website.id
  policy = <<POLICY
  {
    "Version": "2008-10-17",
    "Id": "PolicyForCloudFrontPrivateContent",
    "Statement": [
        {
            "Sid": "AllowCloudFrontServicePrincipal",
            "Effect": "Allow",
            "Principal": {
                "Service": "cloudfront.amazonaws.com"
            },
            "Action": "s3:GetObject",
            "Resource": "arn:aws:s3:::{バケット名}/*",
            "Condition": {
                "StringEquals": {
                    "AWS:SourceArn": "arn:aws:cloudfront::{AWSアカウントID}:distribution/{ディストリビューションID}"
                }
            }
        }
    ]
  }
POLICY
}

// cloudfront
locals {
  s3_origin_id = "nshmura.com"
}

resource "aws_cloudfront_origin_access_control" "website" {
  name                              = "{バケット名}.s3.ap-northeast-1.amazonaws.com"
  description                       = ""
  origin_access_control_origin_type = "s3"
  signing_behavior                  = "always"
  signing_protocol                  = "sigv4"
}

resource "aws_cloudfront_distribution" "website" {
  origin {
    domain_name              = aws_s3_bucket.website.bucket_regional_domain_name
    origin_access_control_id = aws_cloudfront_origin_access_control.website.id
    origin_id                = local.s3_origin_id
    origin_path              = "/website/public"
    connection_attempts      = 3
    connection_timeout       = 10
  }

  enabled             = true
  is_ipv6_enabled     = true
  comment             = ""
  default_root_object = "index.html"

  aliases = ["nshmura.com"]

  default_cache_behavior {
    allowed_methods        = ["GET", "HEAD"]
    cached_methods         = ["GET", "HEAD"]
    target_origin_id       = local.s3_origin_id
    compress               = true
    cache_policy_id        = "658327ea-f89d-4fab-a63d-7e88639e58f6"
    viewer_protocol_policy = "redirect-to-https"
    function_association {
      event_type   = "viewer-request"
      function_arn = "arn:aws:cloudfront::{AWSアカウントID}:function/add-index-html"
    }
  }

  price_class = "PriceClass_200"

  restrictions {
    geo_restriction {
      restriction_type = "none"
    }
  }

  viewer_certificate {
    acm_certificate_arn            = "arn:aws:acm:us-east-1:{AWSアカウントID}:certificate/{certificate ID}"
    cloudfront_default_certificate = false
    minimum_protocol_version       = "TLSv1.2_2021"
    ssl_support_method             = "sni-only"
  }

  custom_error_response {
    error_caching_min_ttl = 10
    error_code            = 403
    response_code         = 404
    response_page_path    = "/404.html"
  }
}
ACM の SSL 証明書は us-east-1 リージョンに作成しているので、us-east-1 リージョンの aws プロバイダーを作成している。
provider "aws" {
  region = "us-east-1"
  alias  = "us_east_1"
}
それぞれ少しつづ躓いたり、CloudFront の定義が大きくてなかなか差分が無くならなかったりで、1,2時間がかかった。
Terraform のバックエンドを S3 に変更
この時点では、Terraform の状態を管理する state ファイルはローカルのPCにある。 このファイルには機密情報も含まれることもあるのでローカルには置いておきたくない。 また GitHub Actions から実行するためには、GitHub Actions からアクセスできる場所においておく必要がある。
今回は Terraform state ファイルを S3 に置くことにした。
まず AWSコンソールで Terraform state ファイルを保存するための S3バケットを作成する。バケット名は何でもよい。
次に Terraform のバックエンドとして S3 指定する。
# main.tf

terraform {
  ...

  # ここを追加
  backend "s3" {
    bucket = "{S3バケット名}"
    key    = "website.tfstate" # Terraform State ファイルのファイル名。なんでもOK
    region = "ap-northeast-1"
  }
}
最後に terraform init コマンドを実行すると、自動的にローカルの state ファイルを S3 にアップロードしてくれる。
$ terraform init

Initializing the backend...
Do you want to copy existing state to the new backend?
  Pre-existing state was found while migrating the previous "local" backend to the
  newly configured "s3" backend. No existing state was found in the newly
  configured "s3" backend. Do you want to copy this state to the new "s3"
  backend? Enter "yes" to copy and "no" to start with an empty state.

  Enter a value: yes


Successfully configured the backend "s3"! Terraform will automatically
use this backend unless the backend configuration changes.

...
GitHub Actions のワークフロー作成
GitHub Actions のワークフローファイルを作成する。
# .github/workflows/terraform.yaml

name: terraform

on:
  push:
    branches:
      - main
    paths:
      - 'terraform/website/**'

  pull_request:
    branches:
      - main

  workflow_dispatch:
    inputs:
      action:
        type: choice
        required: true
        options:
          - "plan"
          - "apply"

env:
  AWS_REGION: ap-northeast-1
  AWS_ROLE_ARN: arn:aws:iam::${{ secrets.AWS_ACCOUNT_ID }}:role/github-actions-role

jobs:
  deploy:
    runs-on: ubuntu-latest
    permissions:
      id-token: write
      contents: read
      pull-requests: write

    steps:
      - name: Checkout
        uses: actions/checkout@v3

      - name: Configure AWS credentials from IAM Role
        uses: aws-actions/configure-aws-credentials@v1-node16
        with:
          role-to-assume: ${{ env.AWS_ROLE_ARN }}
          aws-region: ${{ env.AWS_REGION }}

      - name: Setup Terraform
        uses: hashicorp/setup-terraform@v2
        with:
          terraform_version: 1.4.2

      - name: Terraform Format
        id: fmt
        run: terraform fmt -check
        working-directory: ./terraform/website

      - name: Terraform Init
        id: init
        run: terraform init
        working-directory: ./terraform/website

      - name: Terraform Validate
        id: validate
        run: terraform validate -no-color
        working-directory: ./terraform/website

      - name: Terraform Plan
        id: plan
        if: github.event_name == 'pull_request' || (github.event_name == 'workflow_dispatch' && github.event.inputs.action == 'plan')
        run: terraform plan -no-color -input=false
        working-directory: ./terraform/website
        continue-on-error: true

      - name: Update Pull Request
        uses: actions/github-script@v6
        if: github.event_name == 'pull_request'
        env:
          PLAN: ${{ steps.plan.outputs.stdout }}
        with:
          github-token: ${{ secrets.GITHUB_TOKEN }}
          script: |
            const output = `#### Terraform Format and Style 🖌\`${{ steps.fmt.outcome }}\`
            #### Terraform Initialization ⚙️\`${{ steps.init.outcome }}\`
            #### Terraform Validation 🤖\`${{ steps.validate.outcome }}\`
            #### Terraform Plan 📖\`${{ steps.plan.outcome }}\`
            <details><summary>Show Plan</summary>

            \`\`\`terraform\n
            ${process.env.PLAN}
            \`\`\`
            </details>

            *Pushed by: @${{ github.actor }}, Action:\`${{ github.event_name }}\`*`;
            github.rest.issues.createComment({
              issue_number: context.issue.number,
              owner: context.repo.owner,
              repo: context.repo.repo,
              body: output
            })

      - name: Terraform Plan Status
        if: steps.plan.outcome == 'failure'
        run: exit 1

      - name: Terraform Apply
        if: (github.ref == 'refs/heads/main' && github.event_name == 'push') || (github.event_name == 'workflow_dispatch' && github.event.inputs.action == 'apply')
        run: terraform apply -auto-approve -input=false
        working-directory: ./terraform/website
上記は、Terraform のドキュメント に載っている ワークフローファイル をベースにして作成した。
主な変更点はこちら
- 任意のタイミングで実行できるように
workflow_dispatchを追加 - ワーキングディレクトリに移動して
terraformコマンドを実行するようにworking-directory: ./terraform/websiteを追加
また GitHub Actions で OIDC を使用して AWS 認証するために、jobs.deploy.permissions を追加したが、プルリクにコメントを追加する部分でコケてしまった。 jobs.deploy.permissions に pull-requests: write を追加することで解決した。
# main.tf
jobs:
  deploy:
    runs-on: ubuntu-latest
    permissions:
      ...
      # ここを追加
      pull-requests: write
あとは細かいところだけど、Terraform のワークフローそのままだとコメントが崩れていた。コメントに改行を入れることで修正できた。
            ...
            <details><summary>Show Plan</summary>

            \`\`\`terraform\n
            ${process.env.PLAN}
            \`\`\`
            </details>

            *Pushed by: @${{ github.actor }}, Action:\`${{ github.event_name }}\`*`;
            ...
ワークフロー実行
ワークフローファイルを main ブランチにプッシュしたら ワークフローが実行できるようになる。
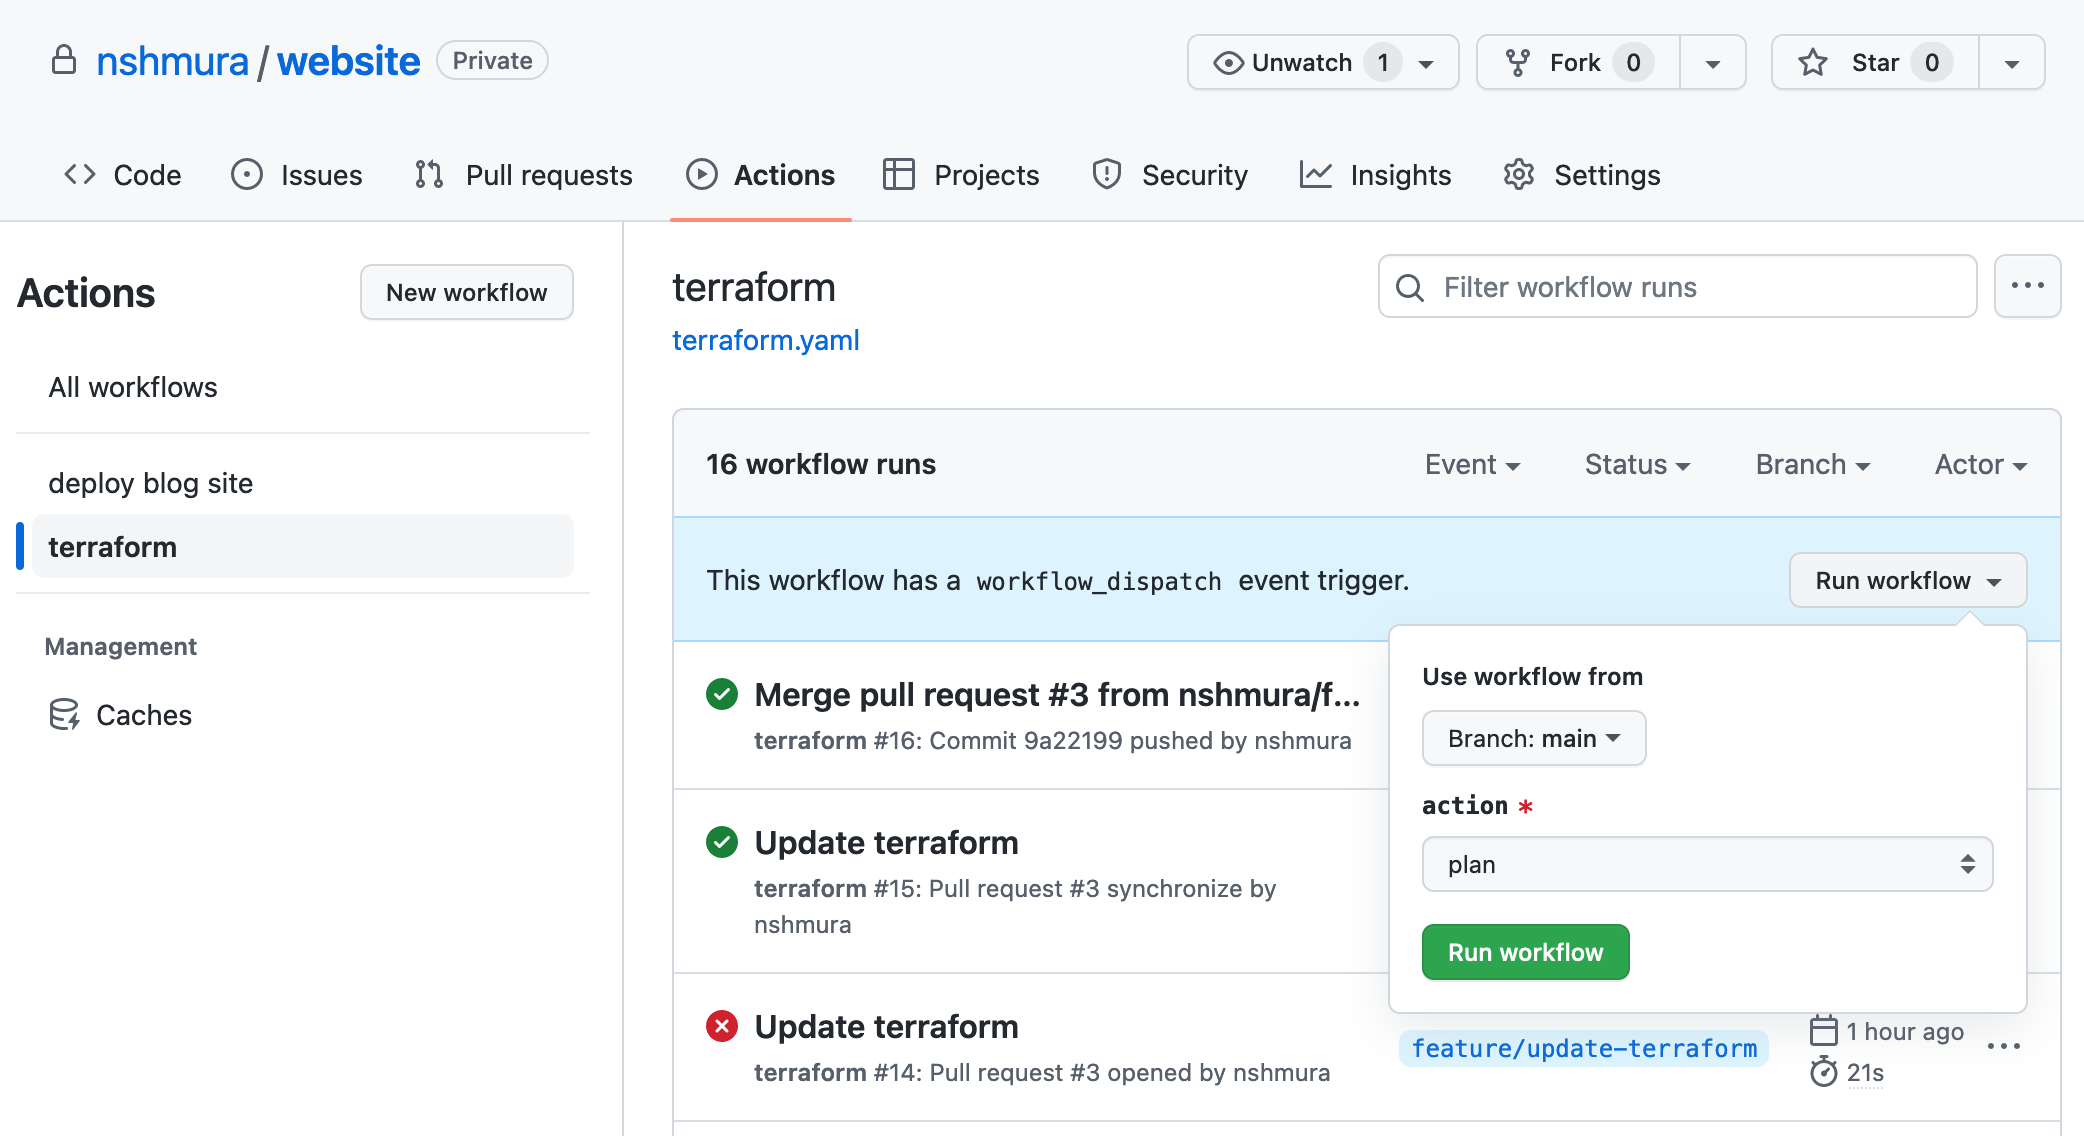
ワークフローを実行すると、GitHub Actions の実行に割り当てている IAM ロールの権限不足で失敗するので、 IAM ポリシーに権限を追加して再実行し、権限エラーがなくなるまでポリシーを調整して再実行することを繰り返した。
ちなみに毎回 GitHub の UI からワークフローを実行するのは面倒なので、gh workflow run コマンドで起動すると楽になる。
$ gh workflow run terraform.yaml -f action=plan
✓ Created workflow_dispatch event for terraform.yaml at main

To see runs for this workflow, try: gh run list --workflow=terraform.yaml
できたもの
リソースを記述しているファイルである main.tf を編集してプルリクを作ると、自動的に terraform plan が実行されて、成功すると次のようなコメントがつくようになった。
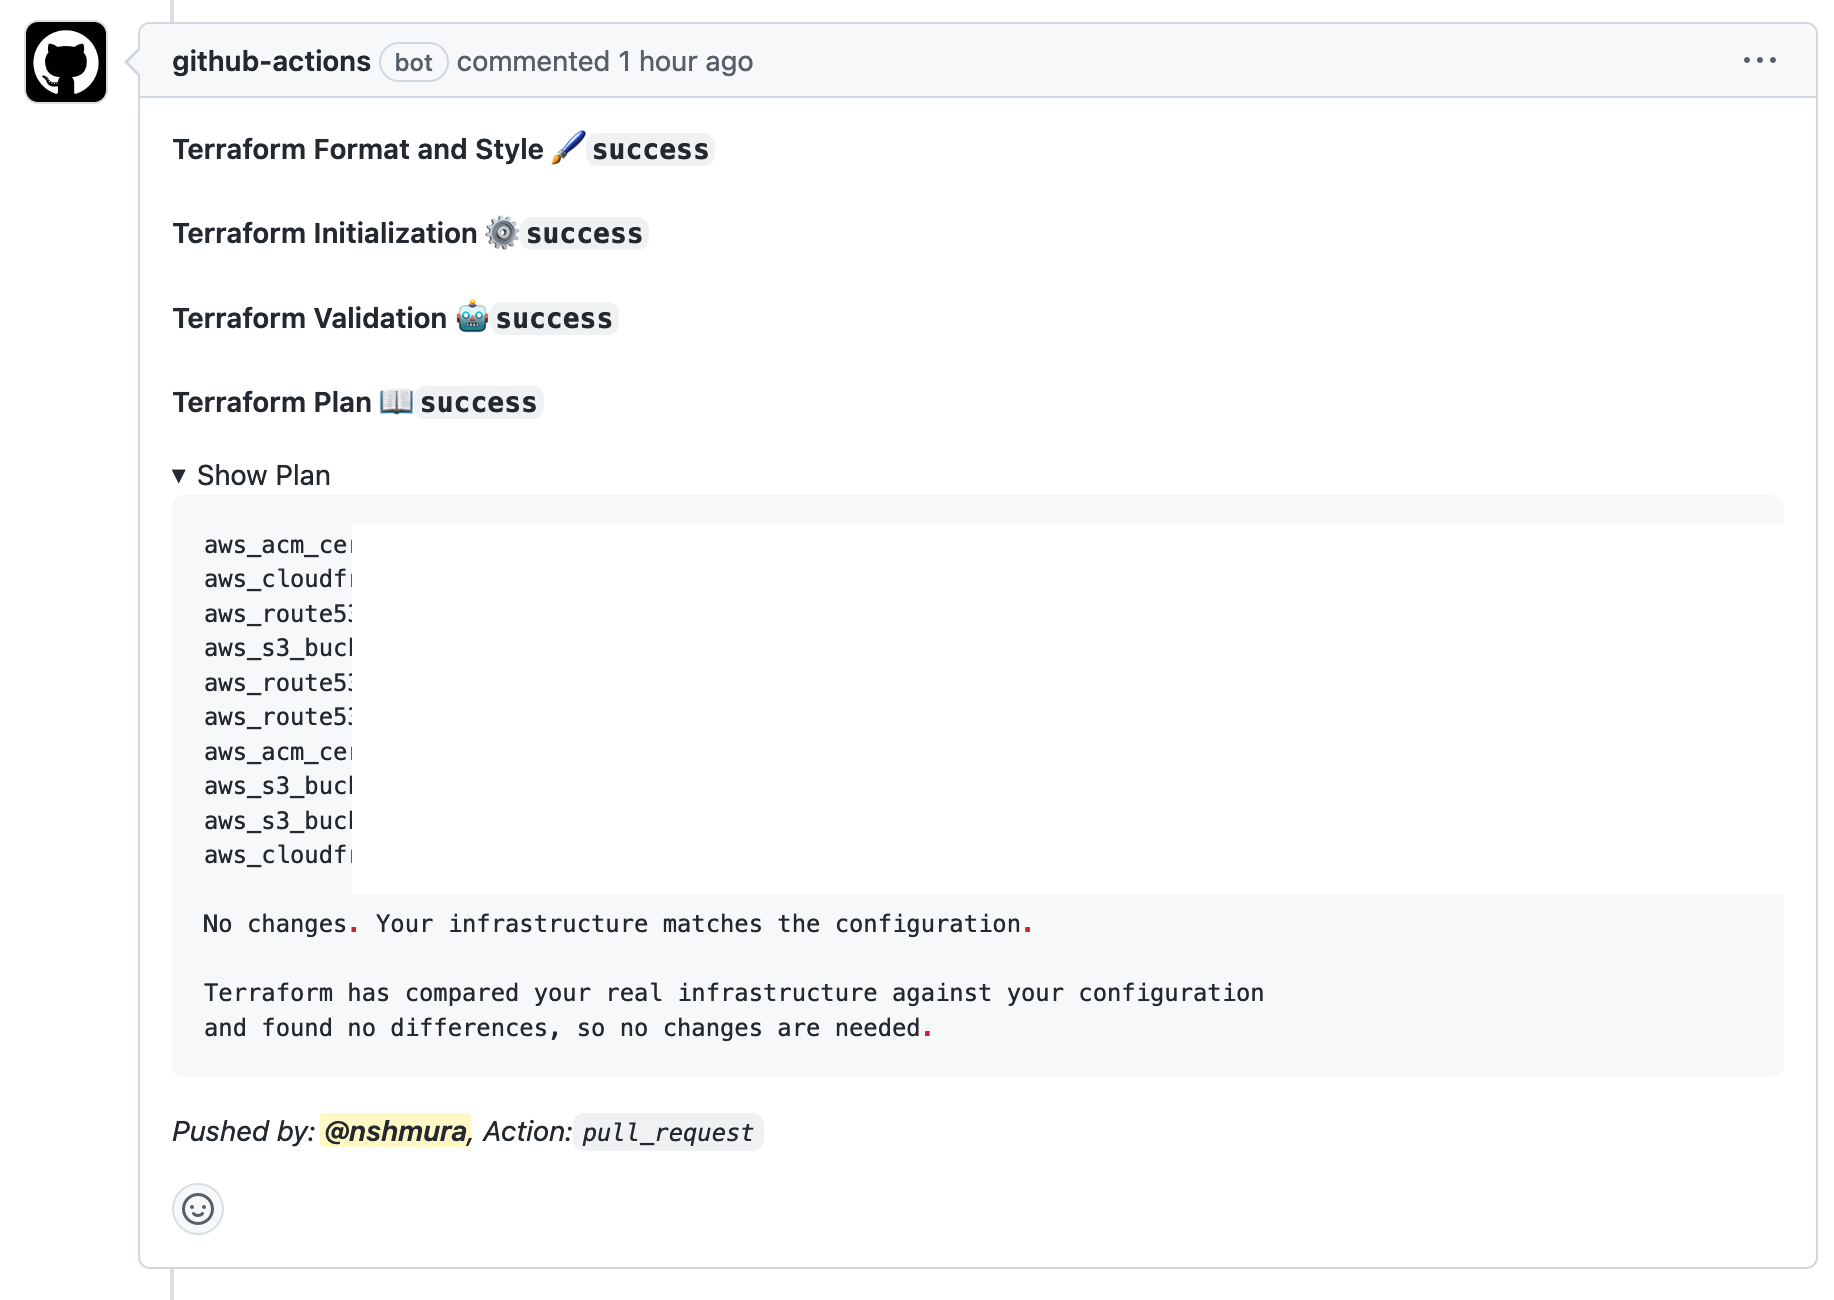
プラン結果までついていてすばらしい 🎉
プルリクをマージすると自動的に terraform apply されてインフラが変更される。
おわりに
Terraform で管理することで、間違って AWS リソースを消したときや、AWS アカウントを引っ越すときの復旧が楽になったはず。
でも丸1日ほどかかったので、個人ブログでやるのは手間がかかりすぎな気もする。もう少しラクな方法があるといいけど。。
普段の業務で Terraform を使っているが、イチから構築することで新たな発見があった。
terraform {}やprovider "aws" {}の意味をちゃんと理解できた- ワークフローで
terraform validateやるべきなこと - プルリクのコメントに
terraform planの結果がつくのは思ったより便利